I saw a post this morning on an app for iOS that allows you to create a custom "homepage" with all of your favorite web links on it and while that sounded cool, I thought that there had to be a better way. I wanted a homepage with custom links done with semi-cool icons that was accessible across multiple devices and was free. It also had to be fairly easy for the non-coding/not enormously tech crazy general populace.
That's not too much to ask is it?
I quickly realized that creating the images was going to be a snap using Canva.com. For the hosting I chose to add a site on my Google Sites account. Now it was just a case of creation, collection and very little, I mean changing two numbers, coding.

First the images.
I use Canva.com a lot. I use it to create banners and page graphics for Twitter, Facebook, Google+ and other web graphics. It's free to set up and use but does have items that you can purchase to use on your graphics as well. You can also upload your own images to use.
First step is to create a free account. Once you do, and then log in, you are presented with "Your Designs"


Add your image dimensions. I used 64 px (pixels) for both. Click "design" when you're set. The next page will show your blank image in the middle of a large gray box. Your tools are on the left side.
Click the plus button in the lower left corner to make your box bigger. I use 300% (two clicks) when I create these.

Now you have this view. Now click the "Background" tab...

...and you'll see this. Now you can select any of the free backgrounds (they say free) or choose a color. I chose a color for creating mine. You can also create custom colors using the little plus button under the color samples.

 I chose a color and then, after clicking on the "Text" tab, selected the top "Add Text" text. Then after choosing text sizes (14-18), fonts, and moving my text box around I ended up with this.

The cool thing is that I can create a copy using the little copy icon to the right and then just change the text and color to suit my 2nd icon.
 Choose the text link at the top of the page and you can change your image's name.
Once you have all of your icons done you can download them by choosing the link at the top right of the page and then "Download ad an image". All of the images in your design are then downloaded to the downloads folder on your computer in a folder named the same as your design.
Create Your Start Page
After completing the Canva part of the process go to Google and sign in to your Google account. If you don't have one you'll need to sign up to complete this little tutorial.
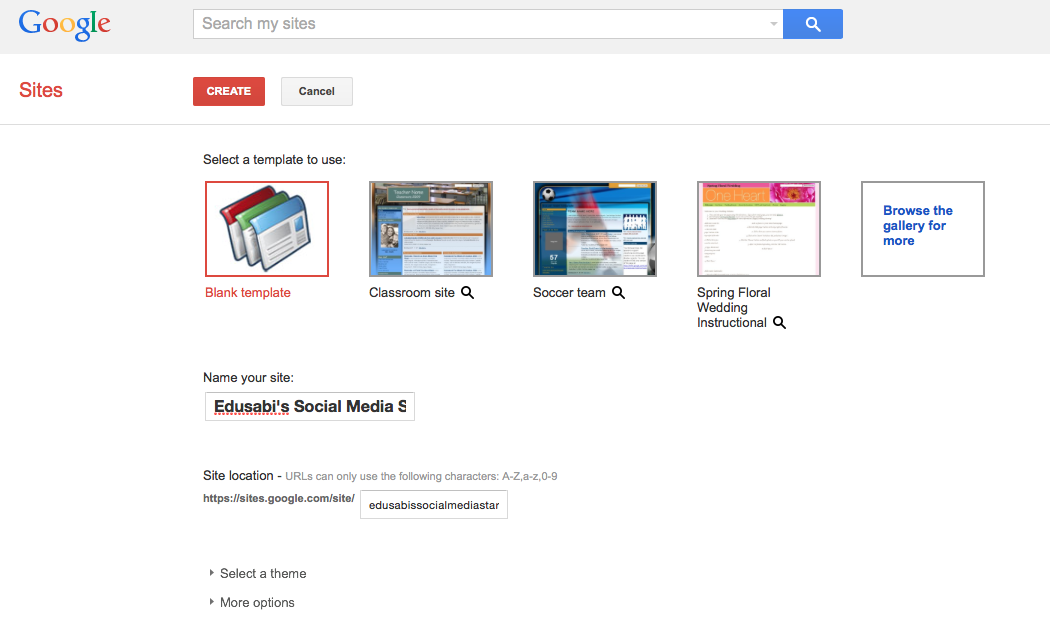 Go to your Google Drive and upload the folder containing your Canva images. Once that is complete go to Google sites and create a new site.
I called mine "Edusabi's Social Media Start Page". Choose the blank template so that your start page isn't cluttered up with anything other than your icons. You could build a pretty comprehensive site using a template with a background image and using add ons like Twitter and RSS feeds but let's keep this one simple.
Once you create your site you end up here.


[Update: February 12th 2015]
I changed the layout to work better on my phone. I also added a couple more resources.
Here's the new layout.

I also noticed that if you wish to have it tighter vertically, like it is now, there's a little more html code modification that needs to happen.
If you look through the code you'll notice on virtually every line.
If you carefully highlight and delete those the grid will tighten up like you see here.
The width adjustment was made in the page settings dialog under Edit Site Layout and the width set to Custom and 450px. See below.


That's not too much to ask is it?
I quickly realized that creating the images was going to be a snap using Canva.com. For the hosting I chose to add a site on my Google Sites account. Now it was just a case of creation, collection and very little, I mean changing two numbers, coding.
I use Canva.com a lot. I use it to create banners and page graphics for Twitter, Facebook, Google+ and other web graphics. It's free to set up and use but does have items that you can purchase to use on your graphics as well. You can also upload your own images to use.
First step is to create a free account. Once you do, and then log in, you are presented with "Your Designs"
From here, and for our purposes in this discussion, click the "Use custom dimensions" link above the "Facebook Post" and "Instagram" boxes.
Click the plus button in the lower left corner to make your box bigger. I use 300% (two clicks) when I create these.
Now you have this view. Now click the "Background" tab...
...and you'll see this. Now you can select any of the free backgrounds (they say free) or choose a color. I chose a color for creating mine. You can also create custom colors using the little plus button under the color samples.
I chose a color and then, after clicking on the "Text" tab, selected the top "Add Text" text. Then after choosing text sizes (14-18), fonts, and moving my text box around I ended up with this.Once you have all of your icons done you can download them by choosing the link at the top right of the page and then "Download ad an image". All of the images in your design are then downloaded to the downloads folder on your computer in a folder named the same as your design.
Create Your Start Page
After completing the Canva part of the process go to Google and sign in to your Google account. If you don't have one you'll need to sign up to complete this little tutorial.
Go to your Google Drive and upload the folder containing your Canva images. Once that is complete go to Google sites and create a new site.I called mine "Edusabi's Social Media Start Page". Choose the blank template so that your start page isn't cluttered up with anything other than your icons. You could build a pretty comprehensive site using a template with a background image and using add ons like Twitter and RSS feeds but let's keep this one simple.
Once you create your site you end up here.
Click on the pencil in the left bar to edit your page.
Now in the upper right side choose "Table" and then "Insert Table" from the menu. drag your cursor over the little boxes until you have a 7x3 table and click.
Now you'll see your table appear in the body of your page. Click in the first box (upper left) and choose "Insert" then "Google Drive" and "Images". Find your image in your Drive and click "Choose". Your image is now in the first box. Now to add the link so that when you click on the icon you will go the the site that it represents.
Open a new tab in your browser and go to the site you want to use, Facebook for instance. Select and copy the URL (don't panic) from the address bar at the top of your browser. In Facebook's case it looks like this:
- http://www.facebook.com
Now return to your Google Sites page and click on the image. You'll get a popup like this.
Click the "Change" link and you'll see the first of the following two screens. The first shows the link field as it is when the box opens and the second one how it looks after you paste the URL into the lower of the two boxes.
Repeat these last few steps for every image that you insert into your page. When you are done, depending on how many images you have, your page will look like this...sort of.
You'll notice two things about my page:
- There is a second page in the navigation to the left called "Webmaster Start Page.
- There are no borders around my images.
The second page is easy. Just save the page you're on and when you return to the page click the "Add Page" icon next to the "Edit" button. Repeat the whole process and you can have several start pages categorized any way you wish.
The borders are "easy" too. At the top of your edit screen is a little button that says "HTML". Click it and you get this.

In the first line you need to change table border= "1" to table border="0". At the end of that line change border-width: 1px; to border-width: 0px; . All you are changing is the 1 to a 0 in both. You don't need to change anything else. Click the "Update" button and you're done.
Now save the page and you're all set to set it as your homepage in your browser. Here are the links on how to do that. Why reinvent the wheel right?
Explorer:
http://windows.microsoft.com/en-US/internet-explorer/change-home-page#ie=ie-11
Safari:
http://www.wikihow.com/Change-Your-Start-Page-on-Safari
https://support.mozilla.org/en-US/kb/how-to-set-the-home-page?redirectlocale=en-US&redirectslug=How+to+set+the+home+pageNow save the page and you're all set to set it as your homepage in your browser. Here are the links on how to do that. Why reinvent the wheel right?
Explorer:
http://windows.microsoft.com/en-US/internet-explorer/change-home-page#ie=ie-11
Safari:
http://www.wikihow.com/Change-Your-Start-Page-on-Safari
Firefox:
[Update: February 12th 2015]
I changed the layout to work better on my phone. I also added a couple more resources.
Here's the new layout.
I also noticed that if you wish to have it tighter vertically, like it is now, there's a little more html code modification that needs to happen.
If you look through the code you'll notice on virtually every line.
If you carefully highlight and delete those the grid will tighten up like you see here.
The width adjustment was made in the page settings dialog under Edit Site Layout and the width set to Custom and 450px. See below.
Comments
Post a Comment